Mastering the Birthday Cake Card: A Practical Guide to Flawless Digital Crafting
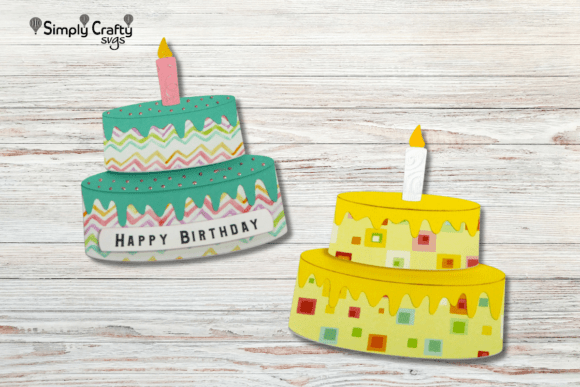
Celebrating a milestone doesn't always require a bakery run or an expensive store-bought greeting. For many crafters, entrepreneurs, and thoughtful friends, the Birthday Cake Card has become the go-to solution for delivering a personalized touch that feels both professional and heartfelt. This specific design, featuring a cheerful layered cake with optional sentiments like "CELEBRATE," "MAKE A WISH," and "HAPPY BIRTHDAY," offers a unique blend of digital convenience and tactile satisfaction. However, jumping into a project involving SVG files and layered assembly without a clear plan can lead to wasted materials and a final product that falls short of expectations.
The appeal of this card lies in its versatility. Whether you are a small business owner looking to add a custom gift to your orders, a blogger creating content for a tutorial series, or simply someone who wants to avoid generic mass-produced cards, this project fits the bill. It is designed to fold down to a standard 4.25" x 5.5" size, fitting perfectly into an A2 envelope, which makes it practical for mailing or handing out at parties. Yet, the path from downloading the file to holding the finished card is paved with potential pitfalls that even experienced creators sometimes overlook.
Avoiding Common Pitfalls in SVG File Usage
One of the most frequent misunderstandings beginners face involves the nature of the SVG file itself. Many assume that because they have purchased or downloaded the file, the design will automatically look perfect on any machine. This is rarely the case. The Birthday Cake Card relies on precise vector paths. If you attempt to cut this design using a machine that isn't calibrated correctly, or if you try to resize the file beyond its intended parameters, the layers may not align.
This misalignment is more than just a minor aesthetic issue; it can ruin the structural integrity of the card. If the cake layers do not sit flush against one another, the card may not close properly, or the visual depth effect—the very thing that makes the design "cheerful" and engaging—will be lost. To avoid this, always test your cut settings on a scrap piece of paper before committing your primary cardstock. Do not skip the test cut. It is a small investment of time that saves significant frustration later.
Another common error is ignoring the scale of the elements relative to the final folded size. The design is optimized for a finished size of 4.25" x 5.5". If you decide to make the card larger to fit a different envelope, you must ensure that every single layer is scaled proportionally. Failing to do so results in sentiments like "MAKE A WISH" appearing too small to read or the cake tiers looking disproportionately thin. Always check the dimensions of your base cardstock sheet before importing the SVG into your cutting software.
Material Selection: Why Paper Choice Matters
The success of a layered card often hinges on the weight and texture of the paper used. While the instructions suggest using American Crafts AC Textured Cardstock in white or seafoam patterned paper, the temptation to use whatever is lying around the craft room is strong. Using paper that is too thin is a critical mistake. Thin paper bends easily, causing the cake layers to droop rather than stand proud, which flattens the 3D effect immediately.
Conversely, using paper that is too thick can cause issues during the folding process. If the cardstock is overly rigid, the fold lines may crack or the card may pop open when inserted into an envelope. The goal is a balance: sturdy enough to hold the shape of the cake layers but flexible enough to fold cleanly. When selecting your materials, prioritize cardstock rated between 80 lb and 110 lb for the main body. For the smaller decorative elements, slightly lighter paper can work, provided it has enough stiffness to maintain its form once glued.
Texture also plays a vital role in the perception of quality. A smooth, glossy finish might reflect light in a way that distracts from the intricate details of the cake design. Matte or subtly textured papers, like the recommended seafoam patterned options, absorb light better and provide a more sophisticated backdrop for glitter glue or ink accents. Don't underestimate how the surface finish affects the overall presentation; a high-quality card deserves high-quality substrates.
Navigating Assembly and Sentiment Placement
The Birthday Cake Card comes with three optional printable sentiments: "CELEBRATE," "MAKE A WISH," and "HAPPY BIRTHDAY." A common oversight is treating these as interchangeable without considering the context of the recipient. Placing "MAKE A WISH" on a card for a retiree might feel slightly off, whereas "CELEBRATE" is universally applicable. Before you print or cut these phrases, take a moment to consider the relationship and the occasion.
Furthermore, the placement of these sentiments requires precision. Because the design features a layered cake, the text must be positioned so it does not get obscured by the frosting or candles. If you customize the message yourself, ensure the font size and style complement the playful nature of the cake illustration. A formal serif font might clash with the cheerful design, while a handwritten script could enhance the personal feel. Always preview the layout digitally before printing.
Assembly is where many projects falter due to impatience. The step-by-step video tutorial included with the file is not just a suggestion; it is a roadmap to efficiency. Skipping steps or guessing at the order of gluing can lead to crooked layers or adhesive seeping onto visible surfaces. Use a glue pen or double-sided tape specifically designed for cardstock to ensure clean edges. If you choose to use glitter glue for extra flair, apply it sparingly. Too much glitter can weigh down the layers and cause them to sag over time, ruining the crisp look of the finished card.
Evaluating Cost and Efficiency Before You Start
For freelancers and small business owners, time is money. One of the hidden costs of crafting is the inefficiency of poor planning. Before you begin the Birthday Cake Card project, calculate the yield from your paper stock. The design uses one 8.5" x 11" sheet for the main card, but remember that you need additional space for the smaller elements. If you are making multiple cards, arrange your layout to minimize waste. Cutting individual pieces randomly from a full sheet can result in significant material loss, driving up your cost per unit.
Additionally, evaluate whether the tools you currently own are sufficient. Do you have a reliable cutting machine? Do you have the right blades for textured paper? Investing in a new blade or mat might seem like an unnecessary expense upfront, but using dull tools leads to jagged edges and incomplete cuts, which ultimately wastes more paper and time. It is far more efficient to ensure your equipment is sharp and ready than to struggle through a project with subpar results.
Finally, consider the end-user experience. If you are selling these cards or gifting them, the recipient's first impression is formed the moment they open the envelope. A card that is difficult to open, has uneven folds, or features misaligned text communicates carelessness. By taking the time to follow the guidelines, select appropriate materials, and respect the design specifications, you ensure that the final product reflects the thoughtfulness you intend to convey. The Birthday Cake Card is a wonderful opportunity to create something special, but only if executed with attention to detail and a commitment to quality.