Humanoid Octopus Creature: A Guide to Printing the Abyssal Hybrid
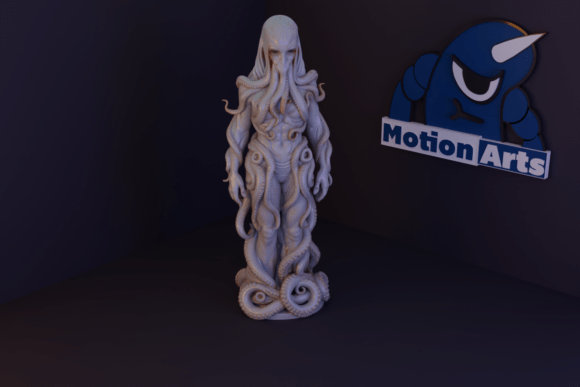
The intersection of human anatomy and cephalopod biology creates a visual language that is both familiar and deeply unsettling. This specific design, known as the Humanoid Octopus Creature, captures that tension perfectly. It blends recognizable human traits with fluid tentacles and organic forms inspired by the ocean floor. For 3D printing enthusiasts, this model represents more than just a cool statue; it is a test of preparation, slicing strategy, and post-processing patience. Whether you are a seasoned creator building a cosmic horror diorama or a beginner looking for your first complex print, understanding the nuances of this file is critical to avoiding frustration.
Many users approach such files with excitement but overlook the technical realities required to bring them to life. The result is often wasted filament, failed prints, or a final product that lacks the intended stability and detail. By examining common pitfalls and adopting better workflows, you can ensure your project succeeds on the first try.
Understanding the Design Intent and Complexity
The appeal of the Humanoid Octopus Creature lies in its stylized volumes. Unlike photorealistic models that might struggle with overhangs, this design integrates details directly into the body structure. However, "stylized" does not mean "simple." The fusion of human posture with sprawling tentacles creates significant challenges regarding support structures and layer adhesion.
People are drawn to this model for various reasons: collectors of creature figures, fans of science fiction seeking thematic decor, or educators exploring biological hybrids. Yet, interest alone does not guarantee a successful print. The file is categorized as intermediate for a reason. It requires a balance between aesthetic fidelity and mechanical stability. If you treat this file like a simple vase or a flat keychain, you will likely encounter structural failures during the print process.
Common Mistakes When Preparing the Model
One of the most frequent errors occurs during the initial download and orientation phase. Users often assume that because the model is described as "easy-to-print," it requires no special handling. This misunderstanding leads to two primary issues: insufficient support generation and poor bed adhesion.
Ignoring Support Requirements
The description explicitly states that support is required. Tentacles, by their nature, curve and extend outward. If you attempt to print these without adequate internal or external supports, the material will sag under its own weight before it cools and hardens. This results in drooping limbs that ruin the silhouette of the creature. The mistake here is assuming the slicer's default settings are enough. You must manually adjust support density and placement, particularly where the tentacles meet the torso.
Overlooking Orientation Strategy
Another oversight is placing the model on the build plate without considering the surface area. A Humanoid Octopus Creature standing upright may have a small footprint relative to its height, increasing the risk of tipping or warping. Conversely, laying it flat might hide facial details or create massive support removal tasks. The correct approach involves rotating the model to maximize contact with the bed while minimizing the need for supports on visible surfaces.
How Poor Planning Affects Your Final Result
When these mistakes are made, the impact goes beyond a single failed print. Time and material costs accumulate quickly. A print that fails halfway through wastes hours of machine time and dozens of grams of filament. Furthermore, even if the print completes, poor support removal can leave unsightly scars on the skin texture of the creature, diminishing the "unsettling fusion" effect that makes the design unique.
For those using this model for creative projects or professional displays, surface quality is paramount. Rough textures from hastily removed supports or stringing between tentacles can make the piece look cheap rather than artistic. In a collection of high-quality figures, a poorly executed print stands out negatively, affecting the overall presentation and perceived value of your work.
Practical Steps for a Successful Print
To avoid these issues, adopt a methodical workflow before hitting the "print" button. Start by inspecting the STL file in your slicing software. Look for any non-manifold geometry or holes that could cause extrusion errors. Since this model features well-defined volumes, ensure your infill percentage is sufficient to provide rigidity without wasting too much material—typically between 15% and 20% is adequate for decorative pieces.
- Select the Right Filament: PLA is accessible for beginners, but if you plan to paint the figure or display it in warm environments, consider PETG for better durability and heat resistance.
- Configure Supports Carefully: Use tree supports if your slicer allows. They are generally easier to remove from organic shapes like tentacles and leave fewer marks than standard grid supports.
- Adjust Layer Height: For a model with intricate details, a layer height of 0.16mm or 0.2mm strikes a good balance between print speed and surface smoothness.
- Test the First Layer: Always run a calibration print or a brim test to ensure the base adheres perfectly. A warped first layer on a tall figure like this can lead to catastrophic failure later.
Evaluating the File Before Committing Resources
Before downloading or purchasing the Humanoid Octopus Creature model, verify the file specifications. Check the scale of the model against your printer's build volume. Some versions of such files are scaled for large industrial printers, which would require splitting the model into parts—a task that adds complexity for beginners.
Also, review the community feedback or previews associated with the file. Look for comments regarding wall thickness. If the walls are too thin, they may break during support removal. A robust design should have walls at least 0.8mm thick (four perimeters) to withstand handling. If the file appears flimsy, consider scaling it up slightly within your slicer to increase the perimeter count.
Post-Processing and Finishing Touches
Once the print is complete, the real artistry begins. The organic forms of the octopus benefit greatly from sanding and priming. Because the design integrates details into the body, heavy sanding might flatten those subtle textures. Instead, use fine-grit sandpaper (400 grit or higher) only on support marks and layer lines.
Painting is highly recommended to bring out the contrast between the human-like face and the abyssal tentacles. Using airbrush techniques can help blend the transition zones, enhancing the "fusion" aspect of the design. Remember that the goal is to evoke mystery and the unknown; a flat, unpainted grey plastic model rarely achieves that emotional resonance.
Making the Right Choice for Your Project
The Humanoid Octopus Creature is an excellent addition to any 3D printing portfolio, provided you respect its requirements. It bridges the gap between hobbyist fun and serious artistic expression. By avoiding the trap of rushing the setup and paying attention to support logic, you transform a potentially frustrating experience into a rewarding one.
Whether you are decorating a themed room, creating a prop for a film, or simply expanding your collection, the effort you put into preparation dictates the quality of the outcome. Take the time to slice correctly, choose the right materials, and finish with care. The depths of the ocean are mysterious enough; your print shouldn't be a mystery to solve after it's done. With the right approach, this model becomes a striking centerpiece that truly captures the strange and beautiful unknown.