Monster Doll Girl: A Guide to Printing the Perfect Dark Fantasy Model
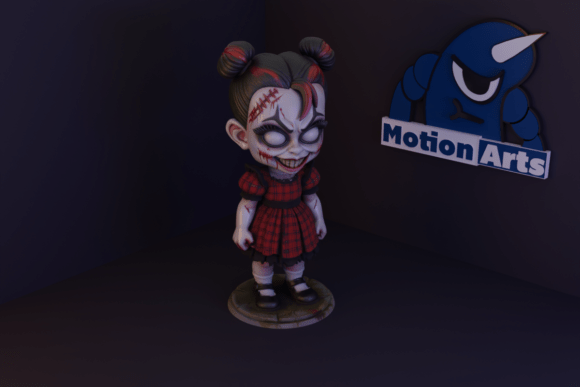
The world of 3D printing has evolved far beyond functional parts and simple geometric shapes. Today, creators are drawn to models that tell a story, evoke emotion, and challenge traditional aesthetics. One such design capturing the imagination of the community is the Monster Doll Girl. This model represents a fascinating intersection of innocence and horror, blending delicate features with monstrous details to create a striking visual contrast. Whether you are building a dark fantasy collection, designing props for a tabletop game, or simply seeking a unique centerpiece for your workspace, this model offers a compelling aesthetic. However, bringing a stylized character like this to life requires more than just hitting the "print" button. Understanding the nuances of the file, the printing process, and post-processing is essential to achieving the intended impact.
Understanding the Design Intent
At its core, the Monster Doll Girl is designed to be mysterious and captivating. The artist has intentionally crafted surfaces that are optimized for stability while maintaining an intense expression and striking shapes. This balance is not accidental; it is the result of careful modeling to ensure the piece is accessible even for those new to 3D printing. The concept appeals to adults who appreciate gothic art, dark collections, and fantasy settings. It is not merely a toy but a sculptural piece meant to convey personality and strength.
When evaluating this model, it is important to recognize why people are interested in it. The allure lies in the juxtaposition of the familiar doll form with unsettling, monstrous elements. This creates a "uncanny valley" effect that is often sought after in horror and fantasy genres. However, many users overlook the specific requirements needed to preserve these artistic choices during the printing phase. If the print settings do not align with the design's intent, the final result can look flat, broken, or generic, losing the very qualities that made the model attractive in the first place.
Common Pitfalls When Choosing and Preparing the Model
One of the most frequent mistakes beginners make when downloading a file like the Monster Doll Girl STL is assuming that all 3D files are created equal. Just because a file downloads successfully does not mean it is ready for immediate printing without inspection. A common oversight is failing to check the orientation of the model within the slicer software. Because this design features intense expressions and intricate surface details, printing it in the wrong orientation can lead to significant layer lines on the face or body, ruining the smooth finish required for the "doll" aesthetic.
Another critical misunderstanding involves support structures. The description explicitly notes that supports are necessary. Ignoring this warning or attempting to minimize supports too aggressively can lead to catastrophic failures. Overhangs on the arms, head tilt, or any protruding monstrous details will sag if not properly supported. Conversely, placing too many supports in areas where they are not needed makes removal difficult and can leave unsightly scars on the print surface. The goal is to find the middle ground where the structural integrity is maintained without compromising the visual quality of the final piece.
The Impact of Poor Slicing Choices
When slicing errors occur, the consequences are immediate and visible. For a character with a strong personality and impactful aesthetic, poor layer adhesion or visible stringing can distract from the design. Imagine printing the face of the Monster Doll Girl with heavy z-seams or drooping eyelids; the emotional impact is lost instantly. Furthermore, inefficient support placement increases material waste and print time, which affects both cost and efficiency. For hobbyists and small business owners, these inefficiencies add up quickly, turning a quick project into a frustrating ordeal.
It is also vital to consider the scale at which you print. While the model may be optimized for a specific size, scaling it down too much can cause the fine details of the monstrous features to disappear entirely. Scaling it up too much without adjusting wall thickness or infill can result in a hollow, fragile figure that breaks easily. The optimization mentioned in the design description refers to a specific balance of geometry and printability that works best within a certain range. Deviating too far from this range requires advanced knowledge of mesh repair and reinforcement, which may be beyond the scope of a beginner.
Practical Advice for a Successful Print
To avoid these common pitfalls and ensure your Monster Doll Girl turns out as envisioned, follow a structured approach before starting the print job. First, inspect the STL file in a viewer to understand the geometry. Look for the direction of the overhangs and identify where supports are absolutely critical. In most cases, orienting the model so that the face is printed facing slightly upward or sideways, rather than directly downward, helps maintain facial detail while keeping support contact points manageable.
Secondly, configure your slicer settings with precision. Since the design is labeled as suitable for beginners, it likely tolerates standard layer heights (0.2mm) well. However, for the face and hands, consider using a smaller layer height (0.12mm or 0.16mm) to capture the intense expression. Enable support generation only where necessary, focusing on the underside of the arms, the chin, and any floating elements. Use tree supports or organic supports if your slicer allows them, as these are often easier to remove and leave fewer marks than traditional grid supports.
Material choice also plays a significant role. While PLA is a great starting point due to its ease of use, the dark and stylized nature of the Monster Doll Girl might benefit from materials like PETG or ASA, which offer better durability and heat resistance. If you plan to paint the model, a matte white or grey filament can provide a neutral base that accepts primer well. Avoid glossy filaments unless you intend to achieve a specific plastic-doll look, as they can highlight layer lines and imperfections.
Evaluating Quality Before You Commit
Before purchasing or downloading the full high-resolution file, if possible, look for preview images that show close-ups of the texture and details. Check user reviews or gallery posts from other makers who have printed the same model. Seeing how others handled the support removal and painting process can provide invaluable insights. Ask yourself: Does the model hold up under scrutiny? Are the proportions correct? Is the file clean?
Furthermore, evaluate your own capabilities and equipment. If you are a complete beginner, start with a test print of a small section or a simpler version of the model to gauge your machine's calibration. Ensure your bed is level and your nozzle is clean. A poorly calibrated printer will struggle with the delicate features of the Monster Doll Girl, leading to wasted filament and frustration. Taking the time to prepare your machine is just as important as preparing the digital file.
Final Thoughts on Bringing the Character to Life
The Monster Doll Girl is more than just a digital file; it is a canvas for creativity and technical skill. By understanding the specific needs of the design—from support requirements to orientation strategies—you can avoid the common mistakes that plague many 3D printing projects. The key is to respect the design's intent while applying practical, corrective measures during the printing process. With the right preparation, patience, and attention to detail, you can transform this mysterious creation into a tangible masterpiece that stands out in any collection. Whether you are printing for personal enjoyment or professional display, taking a methodical approach ensures that the final result matches the intrigue and beauty of the original concept.